Tutorial - Eclipse
Eclipse CDT 4.3 is an excellent, open source Integrated Development Environment (IDE). It provides sophisticated tools for C++ code writing and debugging, and (along with the Pydev plugin, www.pydev.org) is also able to offer professional Python code writing and debugging support. This tutorial will guide you through all the steps to:
- import HARP in Eclipse
- setup Eclipse Launch Configurations
- run the HM encoder/decoder and stop at breakpoints and
- eventually, write your own HM C++ code extension
In the following, we assume that you just downloaded Eclipse CDT from https://eclipse.org/downloads (look for Eclipse IDE for C/C++ Developers) and extracted it into ~/bin/eclipse. Make sure you can run ~/bin/eclipse/eclipse from command line, otherwise check you pathes again. The script "a_build_HARP.sh" assumes Eclipse under this directory. Do not use any Eclipse below version 4.3. Also, do not use any Eclipse installed by the package manager of Ubuntu, Suse, CentOS etc. since they are still rolling out old Eclipse 3.x versions.
To get started, delete the directory "HARP Build" to make sure that you have a shiny new build. Then run "a_build_HARP.sh" and check the output: it should give a line like "-- Found Eclipse version 4.4 ()" somewhere at the start. If not, try to run ~/bin/eclipse/eclipse, try to find the path problem, delete the "HARP Build" directory and try again until it works.
Note: The script "a_build_HARP.sh" will try to detect if an Eclipse project has already been created in "HARP Build", in order to allow fresh HARP code builds without overwriting any settings you may have made to the Eclipse project in the meantime. So best practice is to delete "HARP Build" before each run of "a_build_HARP.sh" until everything works and you see Eclipse project files being generated inside "HARP Build". These project files (".cproject" and ".project") are hidden, so first check if your file browser shows hidden files if you cannot find them.
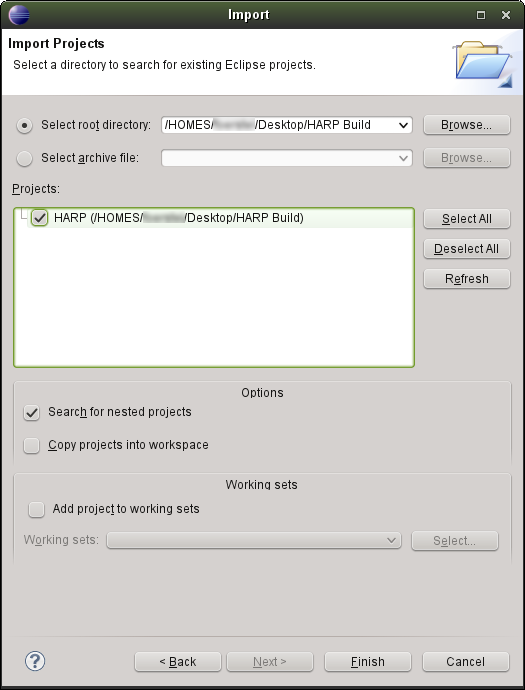
Import HARP's Project Files into Eclipse
So "a_build_HARP.sh" just finished, and you see that CMake just created Eclipse project files under "HARP Build". Great! You can now import the created project files into Eclipse. Start Eclipse (e.g. by running ~/bin/eclipse/eclipse) and go to File->Import. Choose General->Existing Projects Into Workspace and click “Next”. Click “Browse” and select HARP's build directory (not HARP's source directory!) as root directory, e.g. ~/Desktop/HARP Build. If everything goes fine, the project is found, and its corresponding box is ticked. Finally complete the import by clicking “Finish”.
Encoder: Setup of a Simple Launch Configuration
You need to setup a launch configuration to tell Eclipse which binaries it should run when you press run or debug. Also, Eclipse needs to know HARP's command line arguments and some info which directory HARP should run in. So, let's give Eclipse what it needs to know!
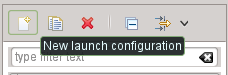
First, navigate to “[Source Directory]” in the project tree and open the file HARP_Defines.h in the editor by double-clicking. Since the focus is on this file now, Eclipse will deduce some info for the launch configuration setup. Then go to Run-> Run Configurations, choose C/C++-Application and click the button in the top left corner which will generate a new launch configuration:
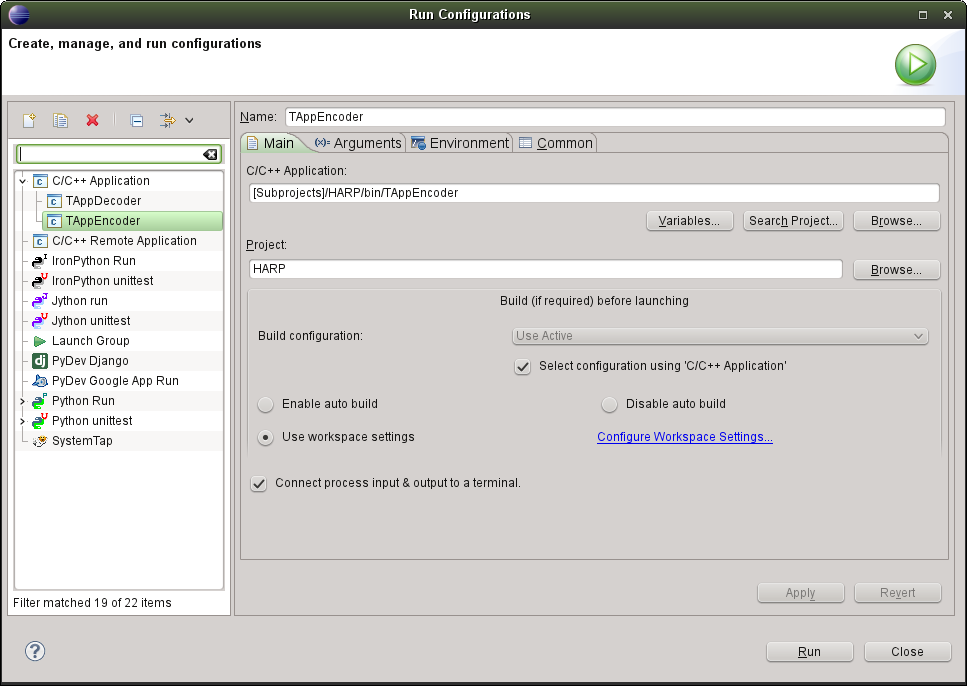
In the first line it should already read “HARP Configuration”. We will first focus on an encoder launch configuration, so change it to something like “HARP Configuration TAppEncoder”. In the line below select Search Project and then select the TAppEncoder binary. You may also use "Browse" to manually select the binary (its located in HARP's bin directory). In the end it should look something like this:
Now to TAppEncoder's arguments! Go to the second tab “Arguments” and copy-paste this line for HARP's example “Running the Encoder”:
-c ../Src_HM/cfg/encoder_lowdelay_P_main.cfg -i ../Various/Resources/Special/LMS_Logo_640x360.yuv --SourceWidth=640 --SourceHeight=360 --QP=10 --FrameRate=30 --InputBitDepth=8 --FrameSkip=0 -f 3 -b str.bin -o rec.yuv --HARP_ObsPOCs=0,1,2,3 --HARP_ObsCTUs=14 --HARP_PUs --HARP_TUs --HARP_RefIndices --HARP_UnitCloseup --HARP_RDO --HARP_TmpDir=./
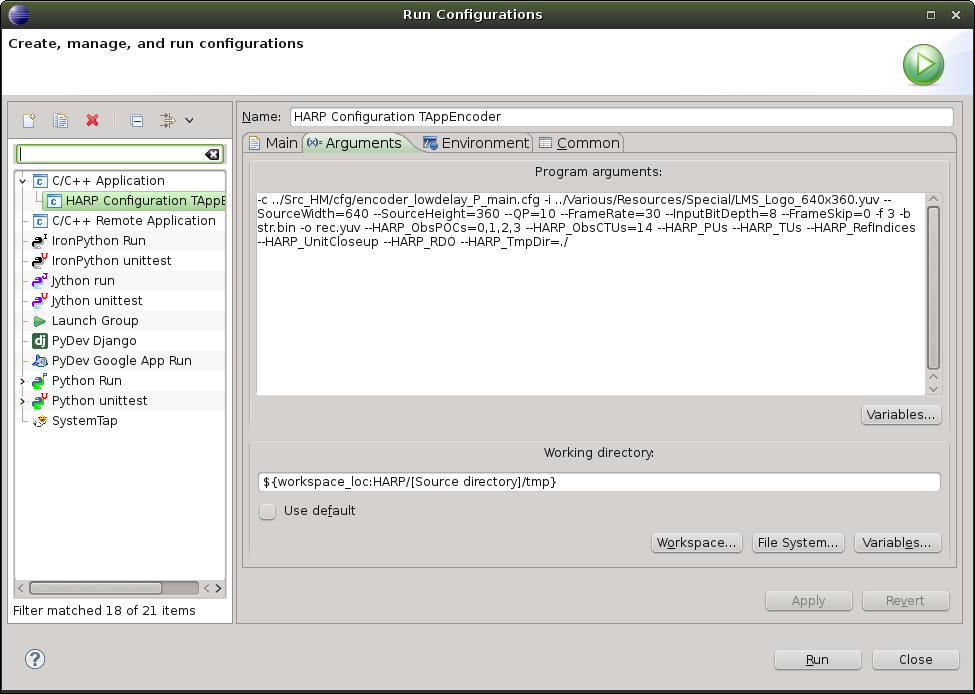
Important: The above arguments assume that your working directory is under ~/HARP/tmp/. Hence, configure Eclipse to launch the encoder in exactly this directory. Start by disabling "Use default". Click "Workspace", select "Source Directory", navigate to "tmp" and click "Ok". It should now read as depicted in the screenshot.
We also recommend that you go to the fourth tab “Common” and enable "Shared file->/HARP". This will place the run configuration directly in HARP's source directory (named *.launch), and not hide it in internal Eclipse directories.
Finally, click “Apply” to save your configurations. Congratulations, you now have a shiny new Eclipse run config. Let's try it out!
Encoder: A First Debug Session with HARP
Foremost, make sure you first run the example “Running the Encoder” under Tutorial – Basic Usage. It will not only show you that everything HARP-related runs fine, but also create the directory encoder_low_delay_P_main in ~/Desktop/HARP/tmp/, which you need for HARP's image export.
Open CShow_PredictionUnits.h in Eclipse and double-click left of a line to set a breakpoint. Finally, press “Debug” to launch a debug session! The Debugger will first stop in encmain.cpp at Global.printVersion(); (l. 58). Just press "F8" to resume. If everything runs fine, HM should stop again a few seconds later once it reaches your breakpoint.
See this screenshot as an example:
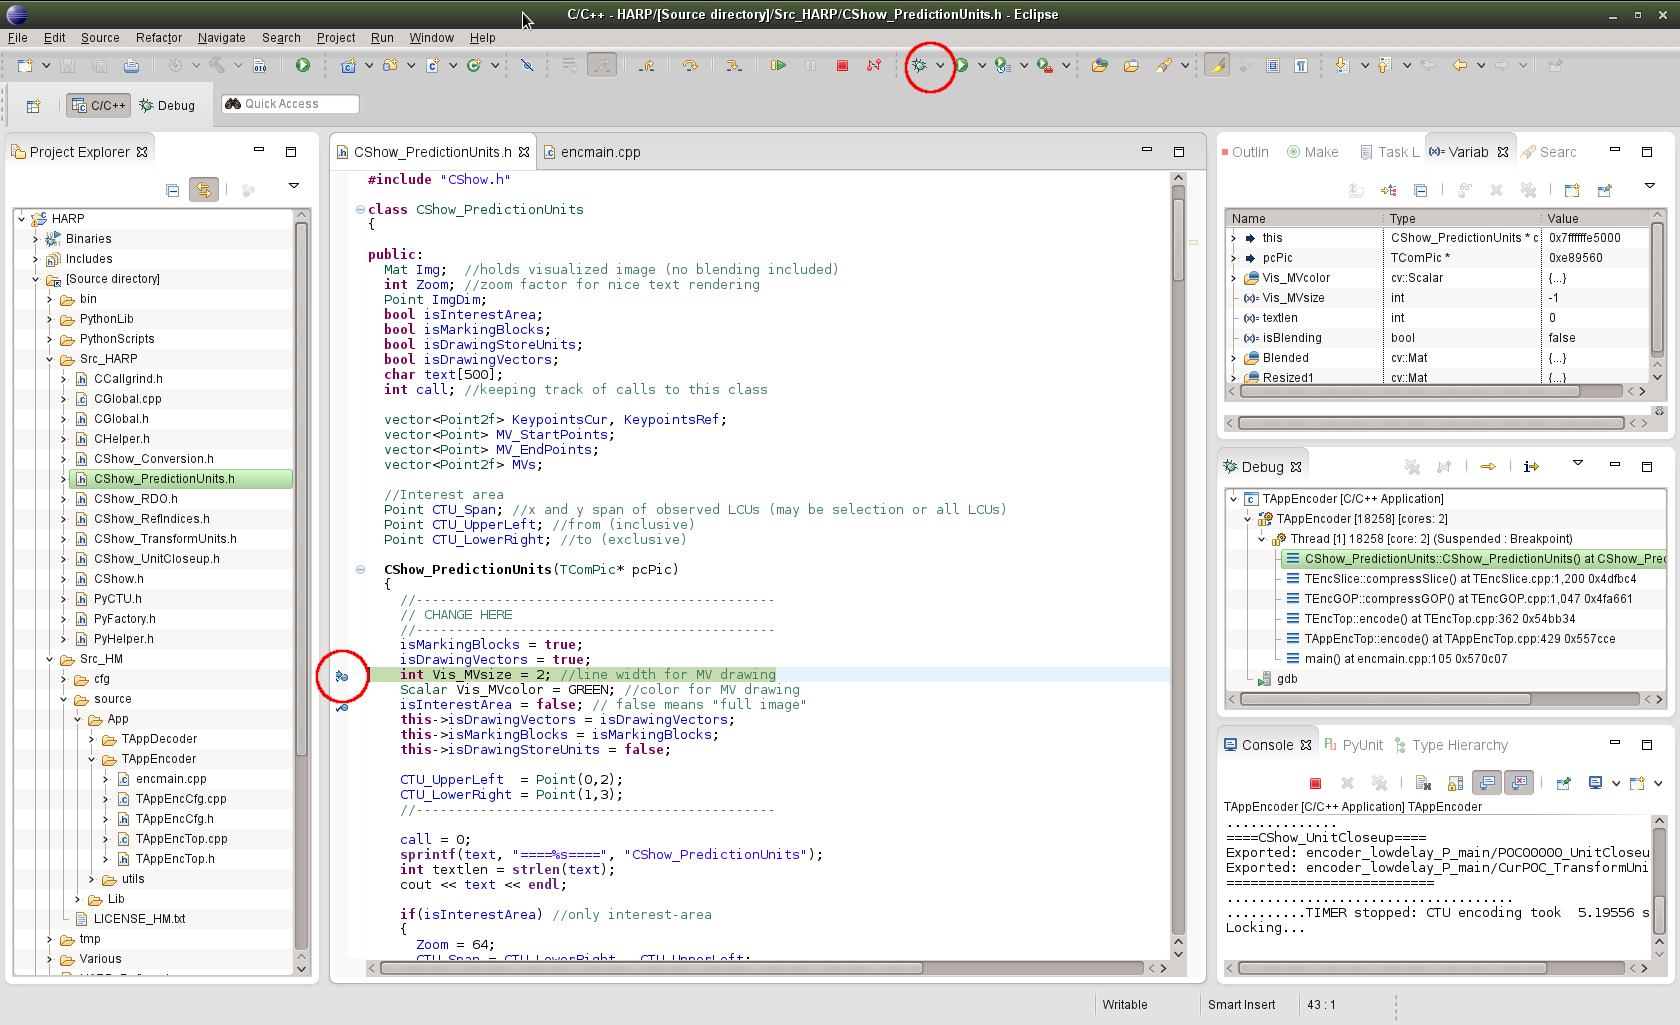
You can now step over the lines with "F6", jump into subfunctions with "F5", or hover over variables to see their values. BTW: An excellent tool in Eclipse is the “Variables” tab, which is available under Window->Show View->Other->Debug->Variables. Give it a try: stop at an arbitrary breakpoint and have a look at the contents of the Varibales tab!

To continue, press "F8". If you remove the breakpoint and press "F8", the encoder will finish its work. Look under ~/Desktop/HARP/tmp (or the corresponding directory where you extracted HARP to) to find HARPs output, for example a TU mode visualization like this:
![]()
And Finally: Debugging the Decoder
This is fairly straightforward: the setup of the decoder configuration is very similar to the encoder. Create a new launch configuration named "TAppDecoder", change the C/C++-Applicaton to [Subprojects]/HARP/bin/TAppDecoder. As program arguments fill in:
-b encoder_lowdelay_P_main/str.bin -o encoder_lowdelay_P_main/rec_DEC.yuv –HARP_TmpDir=encoder_lowdelay_P_main
Don't forget to change the working directory to ${workspace_loc:HARP/[Source directory]/tmp}. Finally make sure that in Common the Save-as-option "Shared File->/HARP" is enabled and click “Apply” to execute your configuration.
xDrawCU() - the core of CShow_PredicitionUnits.h
Each picture is split by HARP in different units, e.g. Prediction Units (PUs), Coding Units (CUs) or Coding Tree Units (CTUs). The atomic data units are the Storage Units (SUs). These are blocks of size 4x4 pixels, which are indexed by z-scan/raster-scan.
The major task of CShow_PredicitionUnits.h is to draw all the CTUs including CUs, PUs and MVs. The core of this class is the recursive call of the function xDrawCU(). It is part of nearly all classes of HARP, so it is worthwhile to have a closer look at it:
TComPic* pcPic = pcCU->getPic();
UInt NumPartInCTU = pcPic->getNumPartInCU();
UInt NumPartInCU = NumPartInCTU >> (uiDepth<<1);
UInt NextCU_Increment = NumPartInCU>>2;
With the instruction TComPic* pcPic = pcCU->getPic() a pointer to the the current picture is determined. We then derive the number of Storage Units in the current CTU respectively CU.
 if( pcCU->getDepth(uiAbsZorderIdx) > uiDepth )
 {
    for ( UInt uiPartIdx = 0; uiPartIdx < 4; uiPartIdx++, uiAbsZorderIdx+=NextCU_Increment )
    {
       UInt uiLPelX = pcCU->getCUPelX() + g_auiRasterToPelX[ g_auiZscanToRaster[uiAbsZorderIdx] ];
       UInt uiTPelY = pcCU->getCUPelY() + g_auiRasterToPelY[ g_auiZscanToRaster[uiAbsZorderIdx] ];
       if((uiLPelX < pcCU->getSlice()->getSPS()->getPicWidthInLumaSamples())
             && (uiTPelY < pcCU->getSlice()->getSPS()->getPicHeightInLumaSamples()))
       {
          xDrawCU( pcCU, uiAbsZorderIdx, uiDepth+1, CTU_Roi, CTU_Anc);
       } // here you are after one recursion step is finished
    }
 return;
 }
The for-loop in the constructor of the class provides that xDrawCU() is called for every single CTU. Internally, a CTU is recursively iterated in order to access all existing CUs at the right depth.
If the depth chosen by the pcCU->getDepth(uiAbsZorderIdx) call, i.e. the size of the CU, does not match the depth uiDepth chosen by the rate-distortion optimization, the CU is broken down further by means of recursion until the final depth is reached.
Once the code arrives at the final depth the next step is coloring the CU corresponding to the mode. Subsequently first the PU borders are drawn in white and then the CU borders are drawn in black. In addition some information about the MVs are collected, though they are not sketched in xDrawCU() directly. Their drawing takes places afterwards, making sure that drawn MVs may extend to positions outside of their corresponding CU.
When the current CU is entirely processed and thereby the deepest recursion step is completed, we go back to the calling function which is due to recursion also xDrawCU(). So we are on recursion level higher at the red marked point you can see in the extract of the code above. The next instruction is return, thus we leave the function and immediately go back to the calling function, which is again xDrawCU(). Hence we get to the red marked point but one more level of recursion higher. Finally we arrive at the first call of xDrawCU(), i.e. the level of the calling CTU, from where we go to the next CU.
Once a CTU is completely processed the for-loop in the constructor makes sure we then continue with the next CTU:
for ( UInt CTU_Index = 0; CTU_Index < Global.NumCTUs; CTU_Index++ )
How to write your own C++ code for HM using HARP
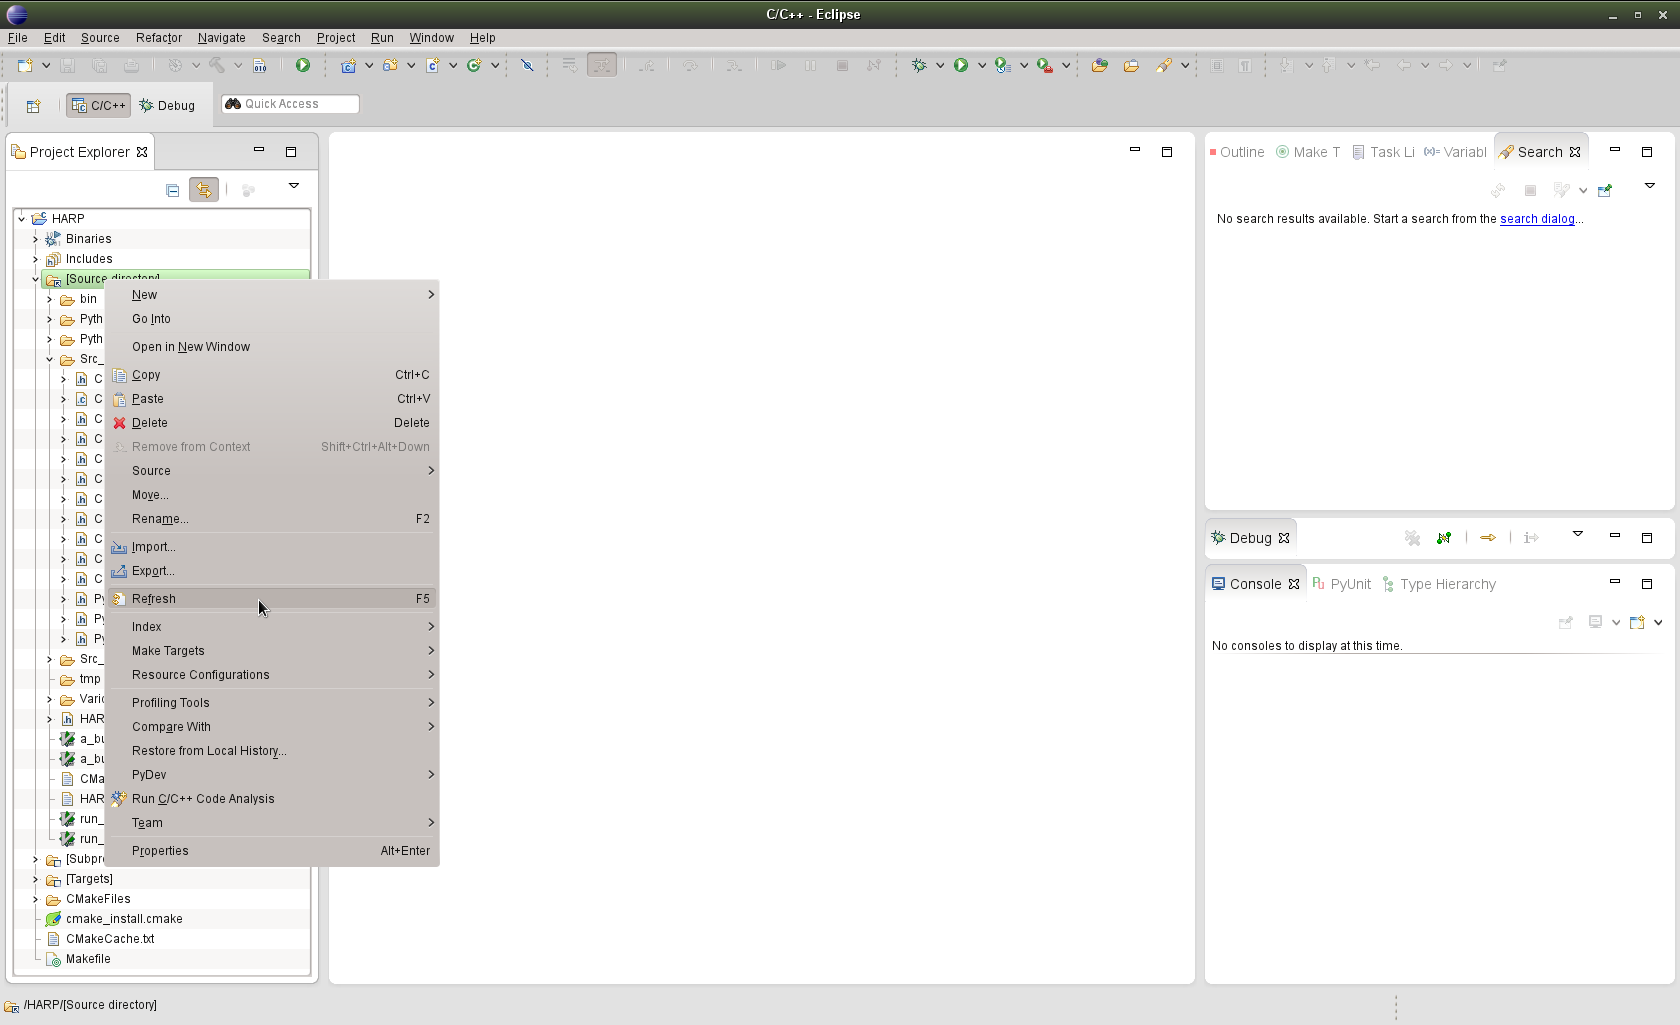
After you had a closer look at the recursion you can start to write your own code. The best is to begin with the class CShow_PU_Test.h. Download it from the website, save it in ~/Desktop/HARP/Src_HARP/ then go to Eclipse, move the cursor over "Source directory" in the Project Explorer, click the right mouse button and choose “Refresh”.
Search via “Ctrl+H” for CShow_PredictionUnits.h. Everywhere you find it in TDecSlice.cpp and TEncSlice.cpp add the corresponding instructions for CShow_PU_Test.h. To avoid confusion please comment out all those instructions for CShow_PredictionUnits.h.
//#include "CShow_PredictionUnits.h"
#include "CShow_PU_Test.h"
…
#ifdef ACTIVATE_HARP
// if (Global.HARP_PUs)
// CShow_PredictionUnits Show_PU(rpcPic);
 if (Global.HARP_PUs)
 CShow_PU_Test Show_PU(rpcPic);
Don't forget to save all the modifications you made!
CShow_PU_Test.h is a strong simplification of CShow_PredictionUnits.h. Everything which is not necessary for drawing CUs/PUs/MVs is kicked out. Before going on just compare the two classes briefly to get an overview.
Now you can experience CShow_PU_Test.h. For a start make some small modifications like changing the colour of the MVs or let HARP only draw CU borders. After every change you ought to save the class and build the project anew before running it.
You can see your changes for example in POC00001_PredictionUnits.jpg under ~/Desktop/HARP/tmp/ or the corresponding directory depending on where you extracted HARP to.